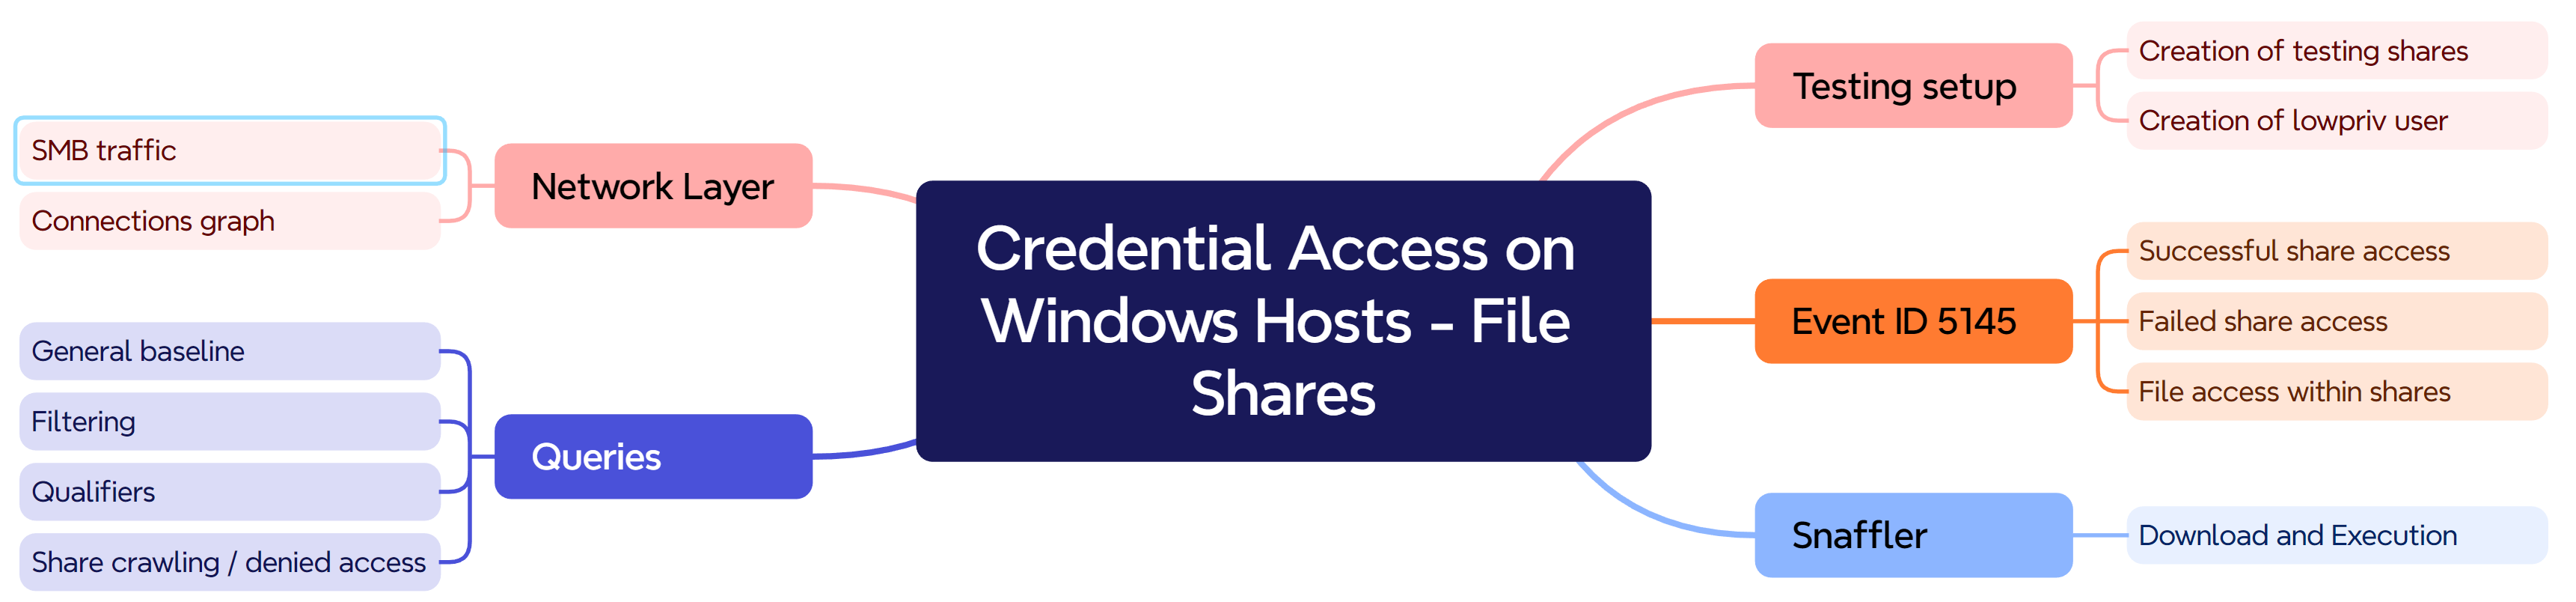
Credential Access on Windows Hosts - File Shares
Virtual machines to power on:
DC
WIN11A
PCAP
In the previous section, we looked at credential access from the LSASS memory process - now let's switch gears a little bit and look at credentials in file shares. These can include anything from databases containing sensitive information all the way to files called passwords.txt.
Let's start by creating some file shares within our domain, we'll be creating these file shares on the domain controller (dc.condef.local) which will be acting as our file server.
On the domain controller, click start and type in "powershell ise" to open up the PowerShell script editor.
If you don't see the white script section, click on View --> Show Script Pane - you should see a window like this:

In the top section, copy and paste the following PowerShell code:
$numbers = 1..15
foreach($number in $numbers)
{
New-Item "C:\Shares\Share$number" -itemType Directory
New-SmbShare -Name "Logs$number" -Description "Test Share $number" -Path "C:\Shares\Share$number" -NoAccess lowpriv -FullAccess 'Everyone'
}This script will:
Create 15 folders in C:\Sares, named Share[1-15]
Create an SMB share from these folders called Logs[1-15]
Deny the
lowprivuser that we will create in a later step access to these shares
Before running the script, in the bottom blue script section of the PowerShell ISE window, run the following:
New-ADUser -name 'lowpriv' -AccountPassword (Read-Host -AsSecureString "AccountPassword") -Enabled $trueEnter in any memorable account password you wish, then go ahead and click the run script button at the top or hit the F5 key - if you don't see the green play button, click on view --> show toolbar.

Now let's go ahead and browse to one of these shares, from one of your Windows 11 machines, open up file explorer and navigate to: \\dc\logs1\
Back on our domain controller, we should see an event ID 5145 generated:

Next, open up a command prompt on Win11A and run the following:
runas /user:condef\lowpriv "C:\windows\system32\cmd.exe"
You should see another command prompt open up, this one will be run in the context of the lowpriv user:
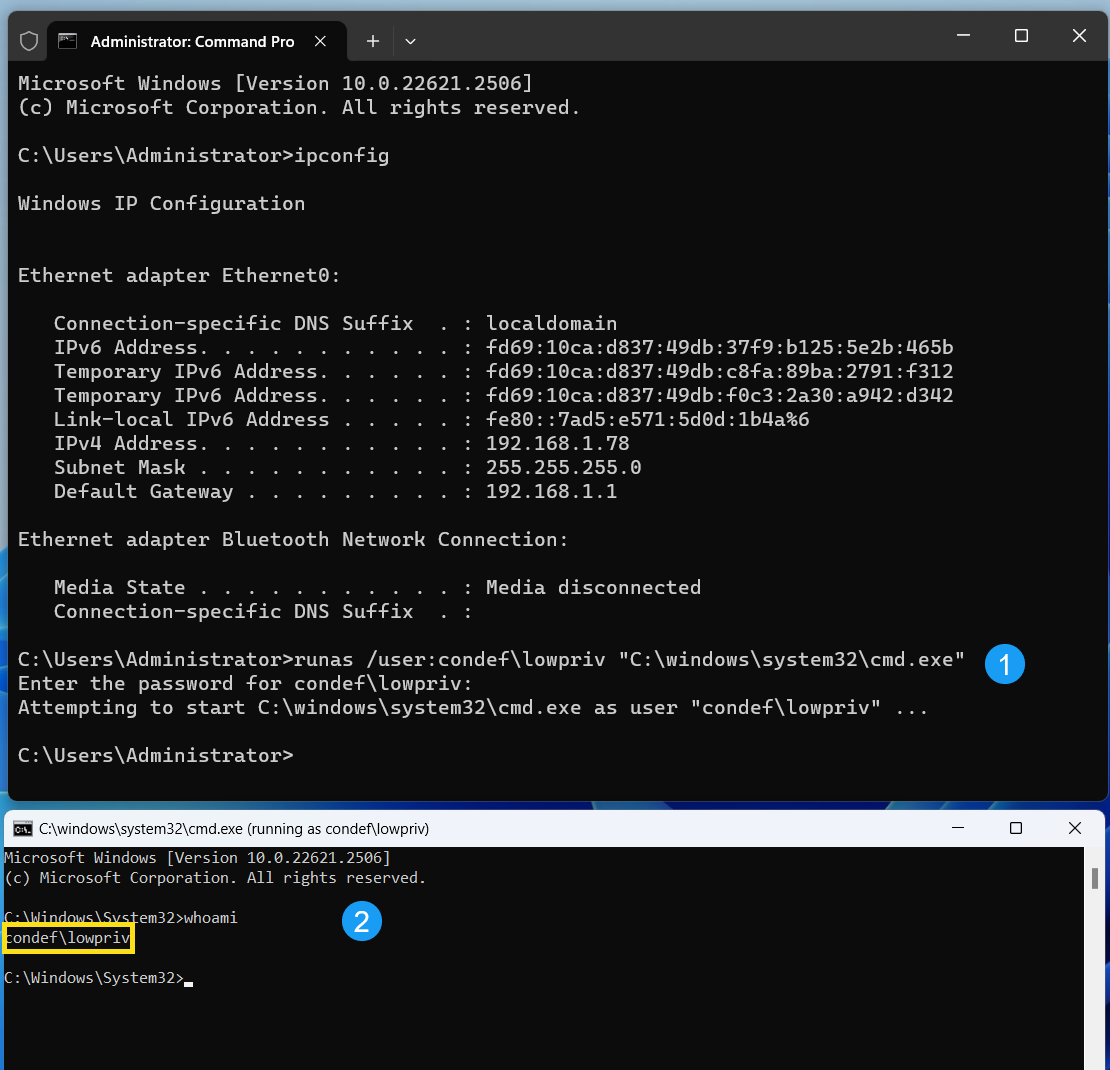
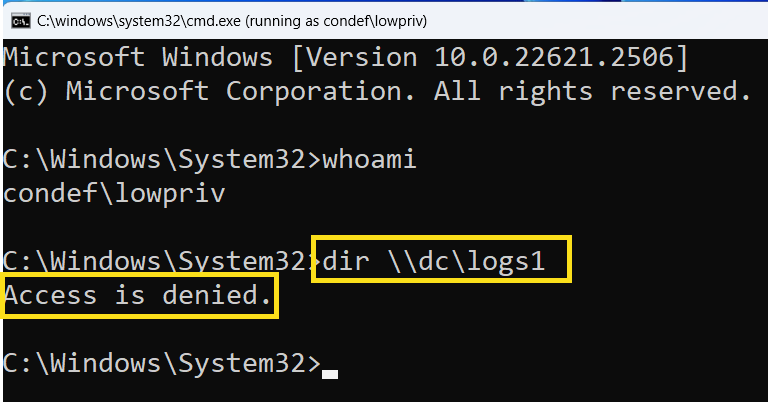
Then, within the command prompt that opened, run the following:
dir \\dc\logs1
You should an access denied:
And once again, looking at our 5145 event, we now see a denied result:

To recap, at this point we have made a couple of test file shares on a domain-joined machine that is acting as a file server. We then attempted to access these file shares from a user account who has access and another user account that does not have access in order to get a feel for what the events look like. As a next step, lets create a test file in our file share, and try to access that.
On the host where the file shares were created, browse to any directory, right click, and create a new text file called passwords.txt - you can also go ahead and add a fake password to this file.

Now go back to your Win11A machine and in a command prompt not open as lowpriv type in: type \\dc\Logs1\passwords.txt

And again, we take a look at our 5145 event:

At this point, we have the critical pieces of telemetry in place, and we can understand what the telemetry looks like when:
A user accesses a file share
A user accesses a file within a file share
A user is denied access to a file share
Now that we have a good handle on the basics of the telemetry, lets run some tools to generate more interesting telemetry.
For this purpose, we'll be using the awesome Snaffler tool, which is available here: https://github.com/SnaffCon/Snaffler
Note: At time of writing, the latest Snaffler version was not working, this version was used: https://github.com/SnaffCon/Snaffler/releases/download/1.0.126/Snaffler.exe
Browse to the releases section and grab the latest executable and save it to a folder on your Win11A ( note you may need to disable windows defender )
Snaffler has a ton of options and advanced configuration options available that I highly encourage you to play around with. The tool is fantastic and can be used for "auditing" your network for sensitive files hanging around in your file shares.
For our purposes, we will be running it with the simple command of: Snaffler.exe -s -o shares.log

Once Snaffler runs, it will discover the shares within our network and will look within the shares for files that contain either interesting extensions, contents or file names - all this can be configured in the Snaffler configuration file.
Let's go to our Sumo instance and check out the following query:
_sourceCategory="winevents"
| where eventid = "5145"
| %"eventdata.relativetargetname" as file_name
| %"eventdata.sharename" as share_name
| %"eventdata.ipaddress" as src_ip
| count(file_name) as file_name_count by share_name
| sort file_name_count desc
This query will look at the 5145 event ID that we've been looking at so far and will rename some fields, and then will count the number of times a particular share was accessed:

This type of query gives us a great sense of what we can exclude ( the red highlighted items ).
Please note however, that we are only excluding these share paths/names in the context of an alert or detection that looks for file share crawling.
Looking for access to ADMIN and IPC shares is a great way to wrangle other Active Directory related trade craft like Active Directory discovery and enumeration. However, in this section, we are looking at file share crawling and credential access through file shares, we can ignore these system type file shares for now.
Now that we know what generates "noise" for our purposes, we can go ahead and tweak our query a little bit:
_sourceCategory="winevents"
| where eventid = "5145"
| %"eventdata.relativetargetname" as file_name
| %"eventdata.sharename" as share_name
| %"eventdata.ipaddress" as src_ip
| where share_name != "\\\\*\\C$"
| where share_name != "\\\\*\\ADMIN$"
| where share_name != "\\\\*\\IPC$"
| where share_name != "\\\\*\\SYSVOL"
| where share_name != "\\\\*\\NETLOGON"
| where file_name != "\\"
| values(file_name) as file_accessed by src_ip,share_name
And looking at the results, we now see our passwords text file being accessed:

At this point, we have all the information we need in order to craft hunts / alerts / detections for sensitive file share access.
How do we know where the sensitive files are within our file shares - Snaffler can tell us this information, especially with a custom configuration file that is tailored to your particular network. We can use the data that Snaffler returns to us and use it for our own alerting. In our simplistic example, Snaffler found our passwords.txt file, so we know that a file containing some credentials hangs out in our file shares so we can go ahead and this logic to our query:
_sourceCategory="winevents"
| where eventid = "5145"
| %"eventdata.relativetargetname" as file_name
| %"eventdata.sharename" as share_name
| %"eventdata.ipaddress" as src_ip
| where share_name != "\\\\*\\C$"
| where share_name != "\\\\*\\ADMIN$"
| where share_name != "\\\\*\\IPC$"
| where share_name != "\\\\*\\SYSVOL"
| where share_name != "\\\\*\\NETLOGON"
| where file_name != "\\"
| if(file_name matches /(password|passwords)/, 1,0) as sensitive_file_access
| where sensitive_file_access = "1"
| values(file_name) as file_accessed by src_ip,share_name
In this query, we are building on our previous queries and are adding a quick if statement with some Regular Expression matches, so that if a file that contains the text password or passwords is accessed, we set a flag on the field called sensitive_file_access to a 1 and then filter the results to display only if this field is present:
Of course, in a real world production network, this data would be much messier and would require additional tuning. However, using qualifiers / "if" statements in combination with excluding noisier directories should allow you to craft operational alerts or hunts.
In the above example, we used Snaffler to identify sensitive files in our file shares and crafted alerts / hunts to detect this activity. This is awesome, but what about alerting on or hunting for general file share scanning?
If you recall, we originally ran Snaffler from an administrator account that has access to all the shares, what do the data look like if we tried to run the tool again using the lowpriv account ?
Let's open up another command prompt as our lowpriv user, and run Snaffler once again.
Note here that you might need to copy the Snaffler executable to a directory that the lowpriv user has access to, such as C:\Users\Public

Once Snaffler has had a few minutes to run, we can check out the following query:
_sourceCategory="winevents"
| where eventid = "5145"
| where keywords != "Audit Success"
| %"eventdata.sharename" as share_name
| %"eventdata.ipaddress" as src_ip
| %"eventdata.subjectusername" as src_user
| count(share_name) as share_fail_count,values(share_name) as share_name by src_ip,src_user
In which we are:
Looking at audit failure events
Counting the number of share access attempts by the source IP and source user name
And looking at the results, we see that the low priv user has failed to access all the "Logs" file shares that we created earlier ( and explicitly denied the lowpriv user access to ):

In a real production network, you will most likely see many accounts failing to access shares due to changing network permissions over time, one way to deal with this is to again add a qualifier statement to the query, something like:
_sourceCategory="winevents"
| where eventid = "5145"
| where keywords != "Audit Success"
| %"eventdata.sharename" as share_name
| %"eventdata.ipaddress" as src_ip
| %"eventdata.subjectusername" as src_user
| count(share_name) as share_fail_count,values(share_name) as share_name by src_ip,src_user
| if (share_fail_count > 14,"1","0") as high_share_failure_count
| where high_share_failure_count = 1
Although share access failures will occur in a network, there should be a stark difference between a user accessing some shares they do not have access to versus Snaffler sweeping your entire estate for file shares.
A note that should be made: this section focused heavily on credentials / data found in file shares, it did not cover the network share discovery aspect itself.
This is a technique that is difficult to replicate in a small lab environment, however, the Splunk research team has an excellent write-up on this technique, with relevant queries: https://www.splunk.com/en_us/blog/security/sharing-is-not-caring-hunting-for-file-share-discovery.html
Let's not forget the network layer here, go over to your Malcolm instance and run the following search: ip == 192.168.1.78 && ip == 192.168.1.227 && event.dataset == smb_cmd
Where the two IP addresses correspond to your Domain Controller and Win11A host.
Opening up one of the sessions, we see our file share information contained within the packet data:

Now head over to the connections tab in Malcolm and change the Green "DST" value to contain the file path name, so we can visualize which source IP accessed with files within our network:

And a graph should be generated showing all the files that our Source IP accessed:

Now if we tweak our search to only contain event.dataset == smb_cmd the graph will contain all the SMB events, graphing out the source IP and file path fields:
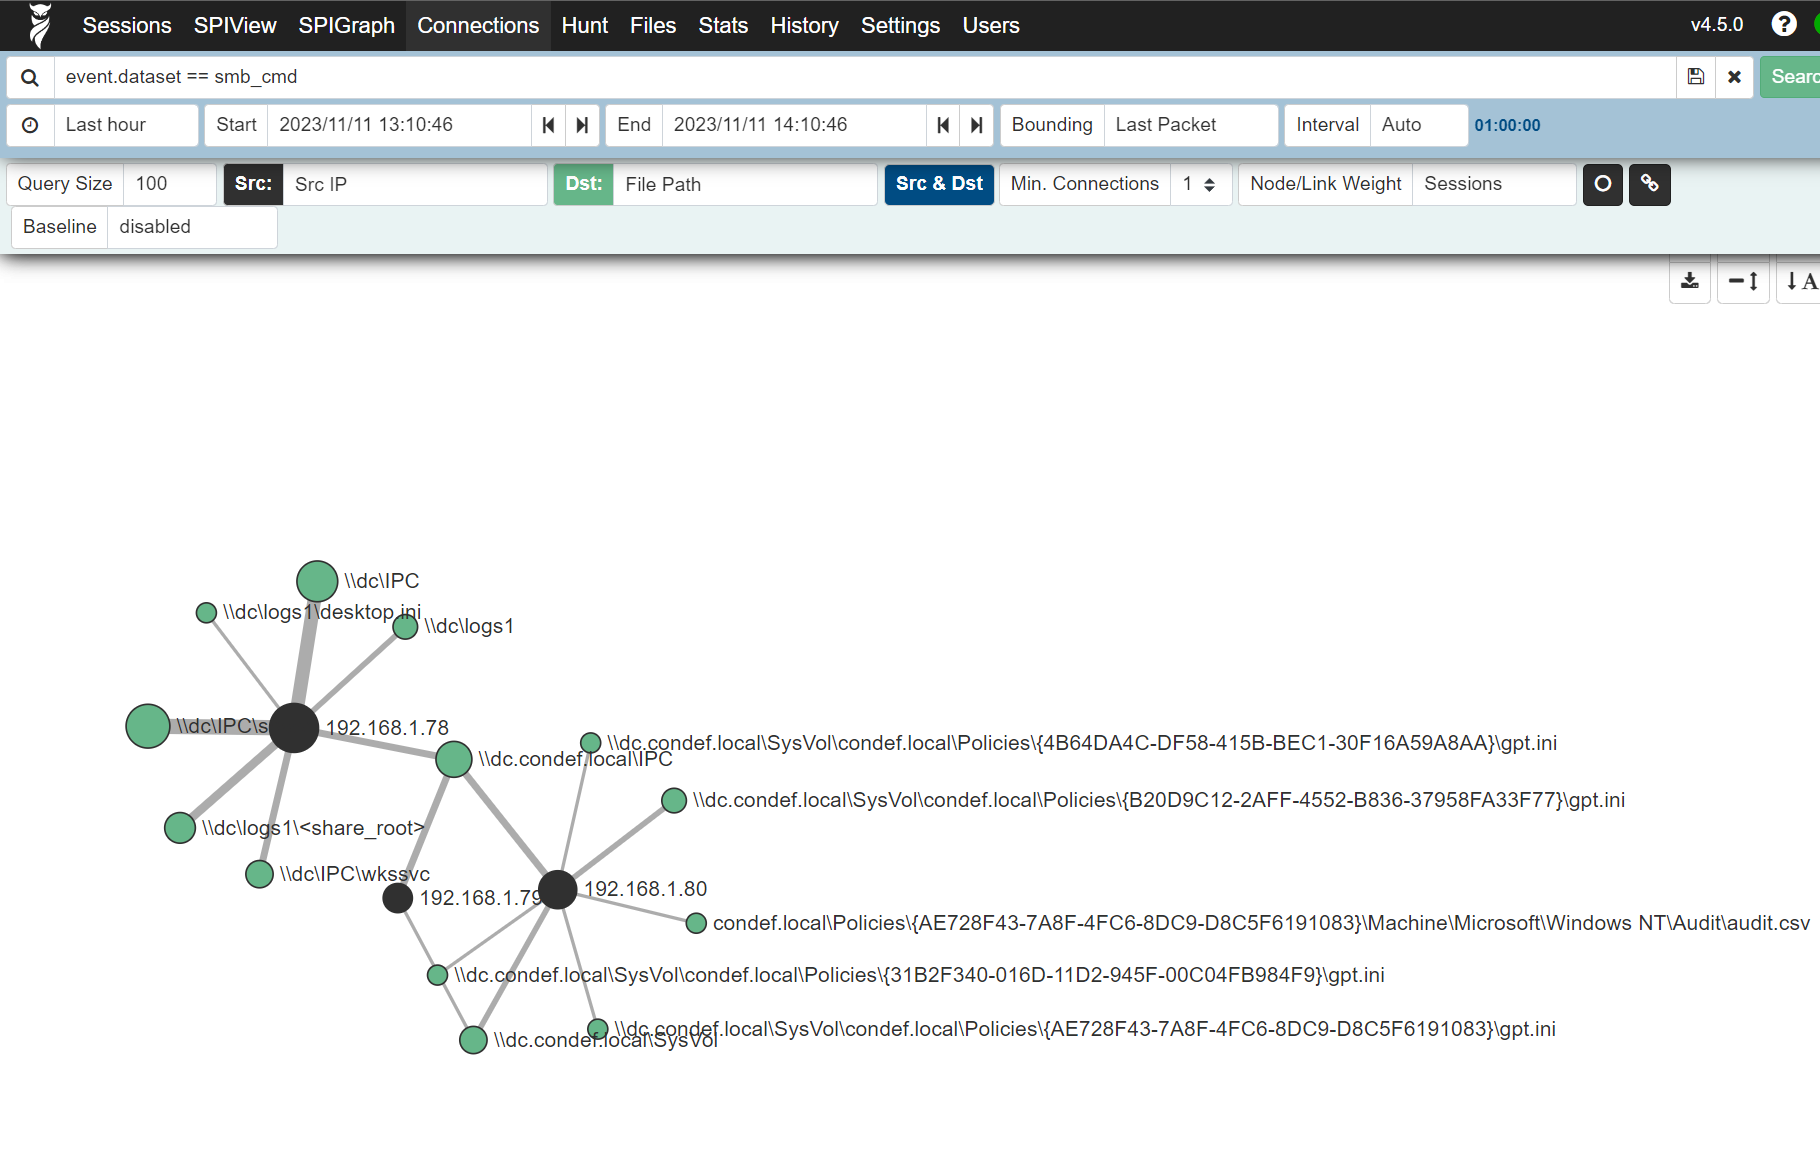
This dynamic nicely demonstrates the interplay between host and network based telemetry and how one can be used to supplement the other - again keep in mind that the network level telemetry is not dependent in any way on host based logging and telemetry - a tremendously powerful resource.
References: